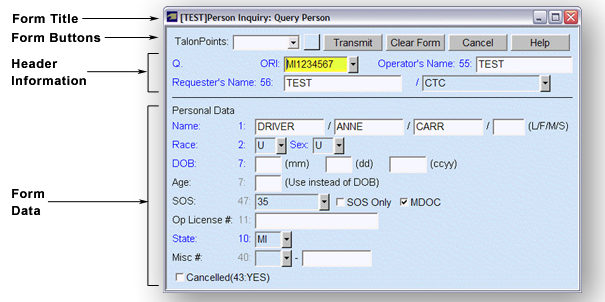
In Talon, you request messages by selecting the appropriate form and entering in the relevant information for your inquiry. Although each form has different data entry requirements, every form in Talon contains similar form elements, as described below.
|
|
Form Title
The title bar displays the name of the form that is currently open along with the Requester's name.
General Form Elements
Blue Fields
Required data fields are displayed in blue. If a required field is not filled-out, the Transmit button will be disabled and you will be unable to transmit your response.
Scan Line Number/Name
A number (10:) or code (ORI:) may appear before a field. This text indicates the scan line number or name this data is associated with in LEIN.
On Screen Notes
Some form elements will have notes after them to give you additional information on how to fill out the form.
Field Help
If you need assistance filling out a field, press either the F1 key or Ctrl+H keys when your cursor is in the field that you have questions about. Either or one of these keystrokes will display help on how to fill out the current field.
Blank Fields
If a non-required field is empty when the form is transmitted, no value for that field is transmitted, nor is the field number or name transmitted.
|
NOTE |
The Blank Form and the Multi-Use Form will not be transmitted if none of the fields on those forms are filled out. |
Header Information
|
|
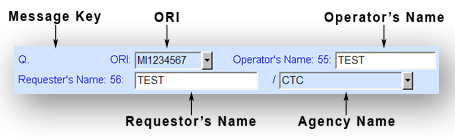
The top section of every form in Talon contains information about who is requesting information and what message is being requested.
Message Key
The Message Key identifies what message is being requested.
|
NOTE |
The message key on the form is not always the message key that is transmitted. Some forms will send a different message key depending on the values entered into certain fields. Other forms, such as Missing Person, may have a list for selecting the appropriate message key. |
ORI
Enter or select your nine character Originating Agency Identifier (ORI). Typically, this field will already have a valid ORI filled-in and may have a choice of ORIs from which you can select. If your administrator allows you to modify your ORI, you can type a new value in this field. If you do not have rights to change the ORI, this field will be disabled but you may still select an ORI if a choice is given.
Operator's Name
When required, enter the Operator Name. This field may be disabled if the administrator did not give you rights to change this information.
FOR field or Requester's Name & Agency Name
When required, enter the Requester and Agency Name. These fields may be disabled on forms that do not require this information.
Drop-Down List Boxes
|
|
Drop-down list boxes are provided for fields that contain a set of choices for field value. On most forms, these list boxes are combo boxes that allow you to either select a value from the list of choices, or type in a new value.
The following are different ways to select or enter a value in the list boxes:
Click the arrow button to view the list choices. Select one of the codes from the list with the mouse. If the text of the choices does not fit in the area, scroll bars are available to allow you to better see the choices.
Click in the list box field with the mouse. Press the arrow keys to move up or down the list of choices. The list box will not appear, but the value in the field will change.
Type a new value in the list box field. This method is only available for combo boxes.
|
NOTE |
Typing a value in the field will not change the selected item in the list. For example, if the default value in the list was MI and you type NJ, if you then drop down the list or use the arrow keys, it will start the selection from MI not NJ. |
Searchable Pop Up List Boxes
|
|
|
Searchable pop up list boxes are provided for fields that contain a large set of choices for field value, such as Zip Code. Press [...] to display a list of the available codes. Use the arrow keys or the scroll bar to locate the code you are looking for. You can also type in a value to search for in the Filter field.
Selecting an option from the list box will replace the current value of the field. Check the Append to existing text option if you wish to select a value and keep your existing field data.
|
NOTE |
Some fields have multiple types of lists associated with them, such as Vehicle Make. For these fields a drop-down list will be displayed above the list of values. Select the category, such as AUTO, from the value that needs to be put into the field. |
TalonPoint Requests
When participating in information sharing, you can request that a form not only queries the standard State law enforcement systems, but also queries any available TalonPoints. Select the specific agency or TalonPoint group from the drop-down list or click the button to customize your selection.

Buttons

Clicking [Transmit] will submit your form.
|
NOTE |
If all the required fields are not entered, [Transmit] will be disabled. Make sure to enter information into all the required fields to enable [Transmit]. |

Clicking [Next] will display the next screen of data to fill-in for the form. [Next] only appears in the Accident forms.

Clicking [Clear Form] will reset the data displayed in the current form.

Click [Cancel] to exit the form without submitting the request.
Additional Actions
|
Transmit the Form |
Click [Transmit], press the Enter key, press Ctrl+T, or press the + on the numeric pad to transmit your message. |
|
Cancel the Request |
Click [Cancel] or press the Esc key to exit the form without submitting your request. |
|
View Field Help |
Press the F1 key or Ctrl+H to view help on the currently selected field. |
|
Copy Field Entries between Forms |
Talon will remember entries made in fields between forms. Press the F2 key or Ctrl+I to have the last value entered into a specific data field pasted into the same data field on the same or different form. For example, enter Doe John into field 1 (Name) on the Person Inquiry form and transmit the request. Open the Criminal History form, click on the Name field and press F2 or Ctrl+I. Doe John will appear in field 1 on the new form. |
|
Store the Current Field Value as the Default Value for the Form |
Press Ctrl+S to save the value in the currently selected field as the default value for that field in the current form. |
|
Restore the Stored Default Field Value |
Press Ctrl+R to restore the stored default value for the current field. |
|
Delete the contents in the current section |
Press Ctrl+D to reset all the field data in the current form section. |
|
Move to the next field |
Press the Tab key or click in a field with your mouse to move to the next field. |
|
Move to the previous field |
Press Shift+Tab or click in a field with your mouse to move to the previous field. |
|
Move to the first field in the next section |
Press Ctrl+Q to move to the first field in the next section on the form. |
|
Cut, Copy, and Paste Data |
Select text in a field with the mouse. Use Ctrl+C to copy the text, Ctrl-X to copy and remove the text from the field, and Ctrl-V to paste the text into another field. You can also right-click with the mouse to display a menu with the copy and paste options. |
|
Print the Form |
Press Ctrl+P to print the current form. |
|
Scroll |
A scroll bar is displayed if the form contents are larger than what can fit on the screen. Most forms should without scroll bars by using 800x600 or higher screen resolution. |
|
Switch between windows |
Press Alt+Tab to switch between Talon windows and/or your other Windows programs. |
|
Clear the Form |
Click [Clear] or press Ctrl+K to clear the fields on the form. |
|
Enter a New Request with the Same Form |
If you are doing multiple requests with the same form, you have two shortcuts available:
|
|
Close all Open Forms |
Press Shift+Esc to close all open form windows. |
|
Switch between all open Talon windows. |
Press Ctrl+F6 to switch between open Talon windows, including the Message window and any open forms. |